It all starts with applicability - JSON Schema Fundamentals part 1
"Validation begins by applying the root Schema to the complete instance document. Applicator keywords apply subschemas to the instance location." - Borrowed from JSON Schema in 5 minutes.
The primary use case for JSON Schema is validation. Therefore it's imperative to understand precisely how the validation process happens. Let's take a little time to properly grasp the fundamental JSON Schema concept of Applicability.
Applicator keywords
JSON Schema consists of many keywords. These keywords can be broken down into categories, one of which is "applicator". In the physical sense, an "applicator" is a thing you use to introduce one substance to another. For example, a cloth might be used to introduce polish to a nice wooden table. The cloth is the applicator. The polish is applied to the table via the cloth.
Applicator keywords in JSON Schema are similar to the cloth, but they are applying Schemas to locations in the instance data (or just, "instance locations").
Starting with everything
The validation process for JSON Schema begins with applying the whole JSON Schema to the whole instance. The result of this application (Schema to instance) should result in a boolean assertion, which is the validation result.
A JSON Schema may be a Boolean or an Object. In the introductory article mentioned above, we noted how a Boolean Schema of true or false resulted in the same assertion result (true and false respectivly) regardless of the instance data. We also noted how the equivalent Object Schemas were { } and { "not": { } } respectively. (The not keyword inverts the assertion result.)
Vocabulary check
An "assertion" is a statement of fact. This is used in reference to the result of testing in Computing. The test might be called "X is 1". If the test passes, the assertion is true!
When we talk about the whole Schema in terms of application, we usually refer to it as the "root Schema". This is because the other Schemas which are applied to specific instance locations are different, and we call them "subschemas". Differentiating between the root Schema and subschemas allows us to communicate with clarity which JSON Schema we're talking about, and when to use the Schema as part of the validation process.
The following examples assume to be using JSON Schema 2020-12. Where there are things you should know about previous versions (or drafts) of JSON Schema, it will be highlighted.
Subschema application - Validating Objects and Arrays
If your JSON instance is an Object or an Array, you'll likely want to validate the values of the Object or the items in the Array. In this introduction, you'll be using the properties and items keywords, and subschemas.
Validating Objects
Let's jump into an example. Here's our instance data.
To create the basics of our Schema, we duplicate the structure and place it under the properties keyword, change the values to empty objects, then define the type.
The value of properties must be an Object, and the values of that Object must be Schemas. These Schemas are subschemas.
OK, let's check our Schema does all we need it to. What happens when our instance is missing, for example, the email field? Validation still passes. This is because subschemas in properties are applied to the instance values ONLY when the keys match.
// Will cause validation error.
We need to make sure we define the appropriate constraint if we want any keys to be required in our object. We can do this by adding the required keyword to our Schema.
We can now be confident that if our required fields are missing, validation will fail. But what if someone makes an error with optional fields?
// Validates because of applicability.
Our field isEmailConfirmed has a STRING value rather than a Boolean, but validation is still passing. If you look closely, you can see the key is spelt incorrectly "isEmaleConfirmed". Who knows why, but here we are.
Luckily, picking this up with our Schema is simple. The additionalProperties keyword allows you to prevent properties (or keys) from being used in an object beyond those defined in properties.
The value of additionalProperties is not just a Boolean, but a Schema. This subschema value is applied to all values of the instance object that are not defined in the properties object in our example. You could use additionalProperties to allow additional properties, but constrain their values to be a String.
There is a little simplification here to help us understand the concept we're looking to learn. If you want to dig a little deeper, check out our learning resources on additionalProperties.
Finally, what if we expect an Object, but are given an Array or another non-object type?
// An array is not an object...
You may find it surprising that this would pass validation! But WHY!?
The three keywords we've explored so far, properties, required, and additionalProperties only define constraints on Objects, and are ignored when encountering other types. If we want to make sure the type is as we expect (an Object), we need to specify this constraint too!
In summary, for the soundest validation, we must express all the constraints we require. Given the properties keyword only applies its Schema values when keys match, and only when the current instance location is an Object, we need to make sure other constraints are in place to capture those other possible situations.
Note, type takes an Array of types. It may be that your instance is allowed to be an Object or an Array, and constraints for both can be defined within the same Schema Object.
Validating Arrays
In this introduction, we're only going to be covering how things work for JSON Schema 2020-12. If you're using a previous version, including "draft-7" or prior, you will likely benefit from digging a little deeper into the learning resources for Array validation.
Let's step back to our previous example data, where we were provided with an Array as opposed to an Object. Let's say our data is now only allowed to be an Array.
To validate every item in the array, we need to use the items keyword. The items keyword takes a Schema for its value. The Schema is applied to all of the items in the array.
As with the applicability rules of properties, the value Schema of items is only applicable if the instance location being validated is an array. If we want to make sure it's an array, we need to specify the constraint by adding "type": ["array"] to our Schema.
There are other keywords that are applicable to arrays, but If I continue to explain all of them in detail, this article might start to turn into a reference book! Moving on...
Apply but modify - Boolean logic with subschemas
JSON Schema applicator keywords can do more than just apply a subschema and take the resulting Boolean assertion. Applicator keywords can conditionally apply subschemas, and combine or modify any resulting assertions using boolean logic.
Let's look at our most basic applicator keywords: allOf, anyOf, and oneOf.
Each of these keywords takes an array of schemas as their value. All of the schemas in the array are applied to the instance.
We'll take each in turn and explore how they are different.
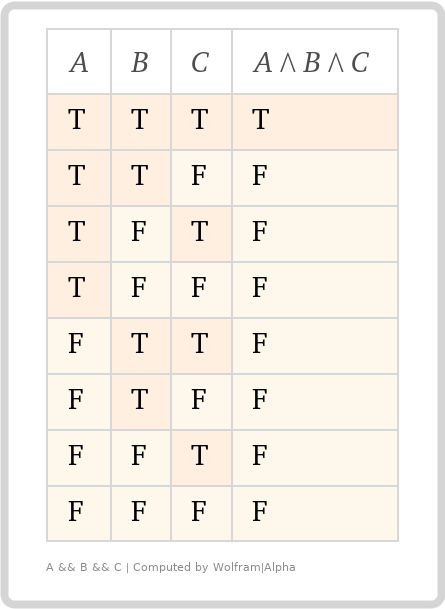
After applying each schema item from an allOf array, the validation (assertion) results are combined with a logical AND. As the keyword implies, all of the schemas in the array must result in a true assertion. If any one of the schemas asserts false (fails validation), the allOf keyword also asserts false.
This sounds simple, but let's look at some examples.
Remember:
A Boolean is a valid schema that always produces the assertion result of its value, regardless of the instance data.
Our first "allOf" example shows the array having three subschemas, which are all true. The results are combined using the boolean logic AND operator. The resulting assertion from the allOf keyword is true.
Our second "allOf" example shows the second item in the array is a false Boolean Schema. The resulting assertion from the allOf keyword is false.
The true and false Boolean Schemas in this example could be any subschemas that pass or fail validation. Using Boolean Schemas allows us to easier demonstrate the use of boolean logic for these applicator keywords.
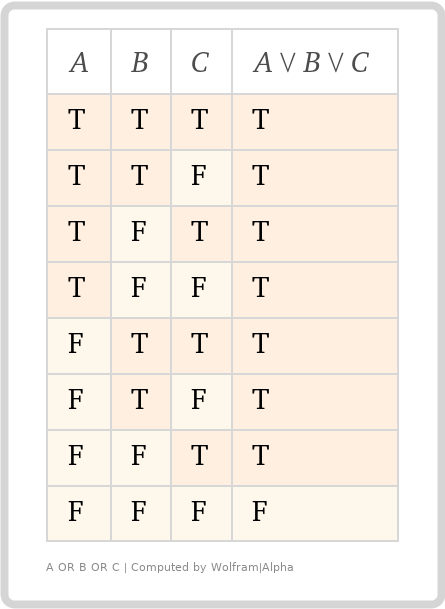
Let's take the two examples again, but use anyOf rather than allOf.
The assertion results of each Schema are combined using the boolean logic OR operator. If ANY of the resulting assertions are true, anyOf returns a true assertion. If ALL of the resulting assertions are false, anyOf returns a false assertion.
Regardless of if this feels intuitive or not, let's look at how these two keywords behave in the form of a truth table. It's going to get a little mathsy, but not much, I promise! (This may seem like overkill or a deep dive, but it's fundamental. Stay with me.)
Truth tables are sometimes helpful in understanding boolean logic, for example looking at equivalencies, such as !(A AND B) is the same as !A OR !B.
Our two truth tables above represent our allOf and anyOf keyword's boolean logic. A, B, and C represent the three subschemas from our earlier example and all possible combinations of their assertion results. T and F represent true and false assertions.
(Remember, the values are subschemas, but we used Boolean Schemas to make the assertion result obvious).
The chevrons are fancy maths things where the up chevron represents "AND" and the down chevron represents "OR". The right-hand column represents the overall assertion result based on the boolean logic in the header.
We can visually see how these two keywords combine the boolean assertion results of their subschemas.
allOf - If "all of" the assertions are true, then the combined assertion is true, otherwise false.
anyOf - If "any of" the assertions are true, then the combined assertion is true, otherwise false.
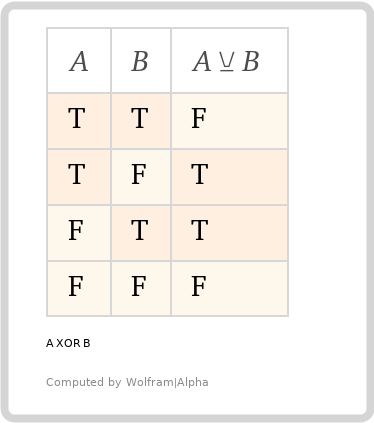
But what about oneOf? The boolean logic used for that keyword is an exclusive OR... sort of. "XOR" for short is often used with electronics but doesn't translate exactly to "one and only one can be true", which is the intent with oneOf in JSON Schema.
Here is our truth table for two inputs (If the array value of oneOf only contained two subschema values).
Looks fine, right? But what if we add another "input", making it an odd number.
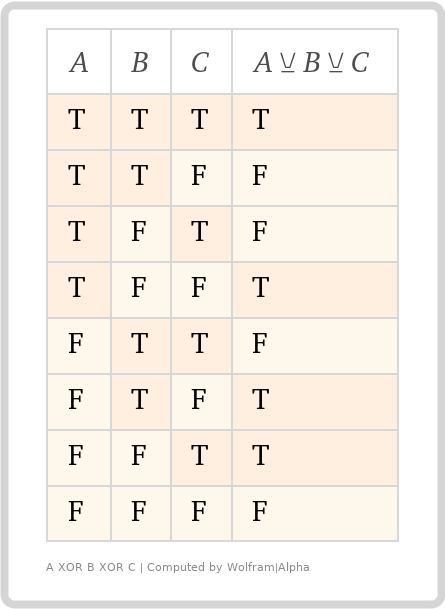
It looks MOSTLY correct, but notice, if all the assertions are true, the resulting assertion is also `true'! That's not what we want, but that is the mathematically correct result. So, we have to extend the logic definition to include "... AND NOT(A && B && C)". Our resulting truth table looks like this.
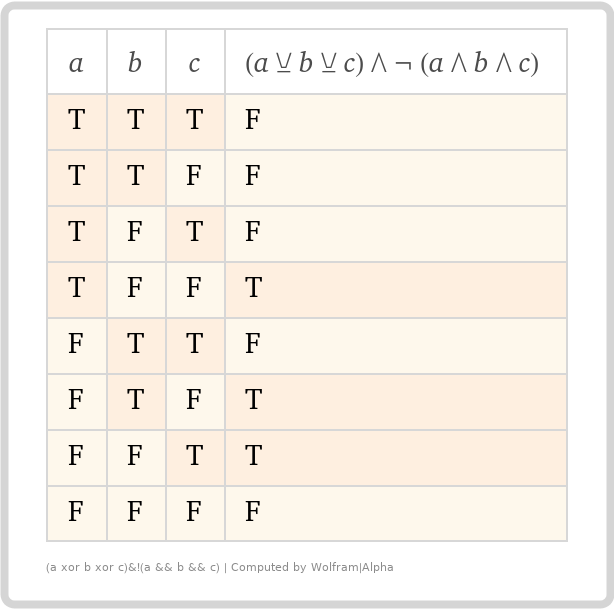
Much better! But why should you care?
Well, now we have the vehicle to understand a pretty common problem, and all the new (or revised) knowledge from above to solve it.
Putting everything together - Avoiding oneOf pitfalls
Let's go back to our array of people data, modify it, and say it represents an array of teachers and students.
To start, let's do the same as we did when creating our first schema. Copy the instance, nest under properties. We also need to nest those Object Schemas under oneOf, the same as how we see allof being used. And nest all that under items to apply schema to every item in the array... Yeah, let's just take a look...
Now let's see what happens when we try to validate our instance with our new Schema...
1should match exactly one schema in oneOf.
2oneOf at "#/items/oneOf"
3Instance location: "/0"
Yikes! That's not what we want!
But why isn't it working? Why isn't the instance passing validation?
What do we know?
The validator is "failing fast". This means it's stopping after the first error.
The instance location being evaluated is the first item in the array.
The error tells us that the first item in the array doesn't match exactly one of the subschemas found in our oneOf. This means it validates successfully for BOTH.
The first item in our instance array is identifying as a student, so should only pass for the first subschema in oneOf. So why is it valid when applying the second subschema?
Let's recap. The properties keyword applies its schemas (which are the values) based on matching keys in the instance Object. The implication we explored earlier is that just having a key in the properties object doesn't make it required in the instance.
When you apply the second subschema in oneOf to the instance, there are no constraints that cause it to fail validation, so it passes validation. If all subschemas consider the instance location to be valid, oneOf fails validation, because it's not "one and only one", as in "true exclusive OR`.
Now you try
We can use the same approach as before to make sure our subschemas have sufficient constraints. Give it a try, and see if you can manage to make the validation work as expected.
The link is pre-loaded with your starting Schema and instance. Let me know if you get stuck via Slack or X.
In summary
Schemas will almost always have some subschemas.
Identifying where subschemas are and how they are applied to the different instance locations, unlocks the ability to assess and evaluate problematic schemas.
You can take almost any subschema as a schema by itself, and test the validation process. (This might not always be possible when the subschema has references.)
Applicator keywords can not only relay the assertion results from subschemas but combine and modify them in different ways, usually using Boolean logic, to provide their own assertion.
Postamble
I've really enjoyed being able to share the first of our fundamentals series with you, and I hope you find it valuable enough to come back for the next article in the series.
You can find all of the example instances and schemas in the JSON Schema Fundamentals repo.
All feedback is welcome. If you have questions or comments, you can find me on the JSON Schema Slack or reach out to me on X@relequestual.
Useful links and further reading
- "Logical connective" (Those fancy mathsy symbols for boolean logic, with Venn diagrams!)
- WolframAlpha
- To visualise truth tables, copy the formular in the images in this article, or try your own. Can also be used for many other "computational Intelligence" related things.
- JSON Schema in 5 minutes article
- JSON Schema in 1 minute video
- Up to date getting started guide
- Weekly Office Hours (Tuesday, 15:00 UTC)
- Open Community Slack Server
- Community GitHub Discussions
- List of implementations
- Human-friendly documentation for understanding JSON Schema
- JSON Schema live playground (ajv) for draft-07 with shareable links
- JSON Schema live playground (hyperjump validator) for all drafts (from draft-04)
- Links to RFC specification documents
Photo by Heidi Fin on Unsplash